Thursday, June 26, 2008

Creating an Ikea Craft room

Well, the new addition to the family is coming soon. Unfortunately, our two bedroom house is full of stuff right now...including our second bedroom, which is eventually (ed: eventually has arrived!) going to be the nursery. At the beginning of this project, it was half full of my wife's sewing and craft stuff, which needed to be moved. (the other half has my hobby stuff, which will be dealt with later) We didn't have any easy places to move it to, however--it is a small house. We had three options:

1. Get rid of the craft stuff (unacceptable)

2. Box up the craft stuff and put it in storage (undesirable)

3. Be creative!

Since we have a carport, we never ever (ever ever ever) use our front door. In fact, our front hall looked like this:


We saw some potential to repurpose this space, so we cleared it out:


We took some measurements and headed to Ikea. First order of business, hide the front door:


We found a cool desk with a pull-out L-extention that exactly fits the space:


A railed storage system will be a good use of space for items that need to be frequently accessed:


There was 8" left over, so we bought an 8" wide shelf that was supposed to be for CD's...I was so happy our measurements were accurate!


Sewing stuff starts to get transfered...


We decide it needs more light, and a power strip. A trip to Wal-Mart for parts (we repurposed the lights from the old craft room)


And, tada! A fully functional craft room in a space once devoted completely to a litter box and some junk.


Hopefully this inspires someone to make the most of the space they have! It was definitely a very satistfying weekend project, and my wife is ecstatic...she says it's the best craft space she's ever had. That's good enough for me to call it a success!

(ed: originally posted 5-8-2008)

An Organized Closet

My closet is a mess right now. However, not too long ago, it looked like this:


I'm hoping that posting this inspires me to get it back in order.


Top drawers: Belts/ties/gloves/misc
Left row, top to bottom: Undershirts, long sleeve t-shirts
Next row, t2b: Solid color t's, textured t's.
Next: Teir 1 shirts, Tier 2 shirts, workout shirts, workout shorts/swimtrunks, Tier 3 shirts, trash shirts
Next: Jeans, Jeans, not jeans, shoes (black and brown in dress and casual + running)
Bottom tray: 4 pairs of flipflops, one pair of slippers, one pair of Vibram 5-fingers, one pair of moccassins
Next to bottom tray: Work boots, hiking boots (not shown, too far left)
Dresser on other side of room: socks and undies.

Yay target organizers!

Also, the pole isn't sorted by type, it's sorted by wear freqency. Whenever I put away a hanging shirt after wearing and washing, I put it on the right, thus my least-worn shirts migrate left, and the most worn stay right. /dork.

Crib Hacking

So (surprising noone reading this blog, I'm sure) I hacked a crib. Wasn't happy with the stock options available to me, so bought a cheap crib on craigslist, bought some table tops at Ikea, and a handful of threaded fasteners (and some white paint) later, Tada! Cool modern crib for under $100.


(that's a really dark wood on the ends)


The dresser and changing table were different light woods, so we painted them white to match the room. One was free, the other was cheap.


Debbie made those curtains. It's strips of ribbon.   I'll post an update when Debbie gets finished with the crib skirt and when we finally get knobs on all the furniture!

Making an Ikea Cat Ladder

My cats are bored. If you're honest with yourself, yours probably are, too--let's face it, the average urban dwelling doesn't offer much in the way of excitement for felines genetically predispositioned to hunting in the jungle. So, in order to give them some exploration options (and because I thought it would be adorable), I decided to give them access to the top of my entertainment center from the back of one of my couches via a series of shelves spaced on the wall at with cat-navigatable spacing, aka a Cat Ladder.


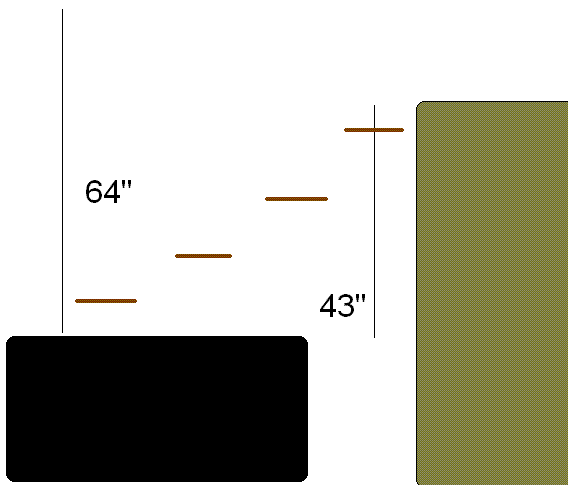
(couch on the left, entertainment center on the right)

My requirements for this cat ladder were:

1. Sturdy and safe

2. Nonslip, kitty-friendly surface to protect overexcited kitties from sliding death

3. Attractive enough to blend in with the living room decor

4. Easy to fabricate in a single evening with minimal tools

5. Cost effective. I set myself a budget of a halfway decent retail cat playground-$80.

Some internetting turned up some interesting homebrew results using Ikea components, so I decided to go to Ikea and see what I could see that matched up with my requirements.

Due to some compromises on size, and some sales, I was actually able to keep it down to $60. You might have to spend more if you don't think your kitties are nimble enough to use 7" deep shelves (they're also available in 11" or 15"), or if you want more shelves, or longer shelves, but the idea is generally the same. On to the hack...

Ikea Materials list:


ROSKILDE Rug x 1 http://www.ikea.com/us/en/catalog/products/80100487 (I think, it was similar to this and on sale for $1.99)

BJÄRNUM 7 1/2" x 4 http://www.ikea.com/us/en/catalog/products/10032411

JÄRPEN x 2 http://www.ikea.com/us/en/catalog/products/00110466

FIXA wall anchors and screws


Other supplies, in order of appearance:


Wood Saw
Scissors
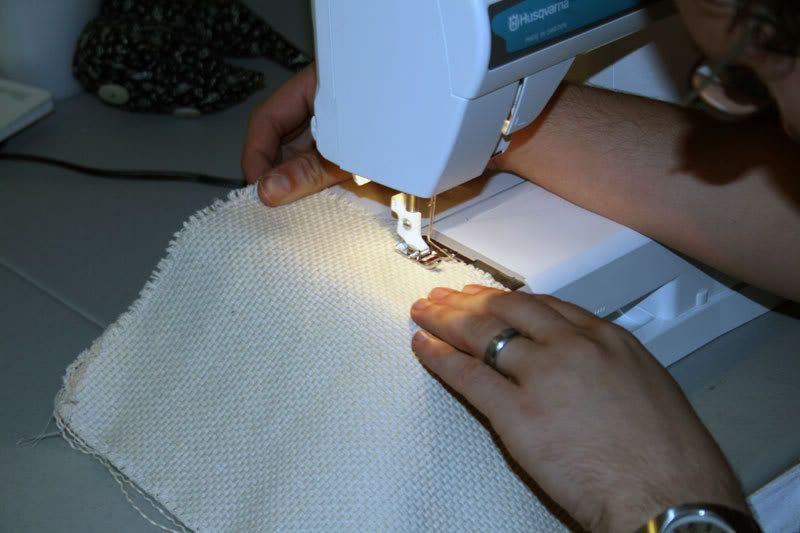
Sewing Machine (or needle and thread + more freetime/patience than I had)
Hammer
Flexible Metal Puddy knife
Hot Glue Gun and Glue


Optional mounting supplies:

Stud Finder/Level/Drill with screw attachement


Directions:

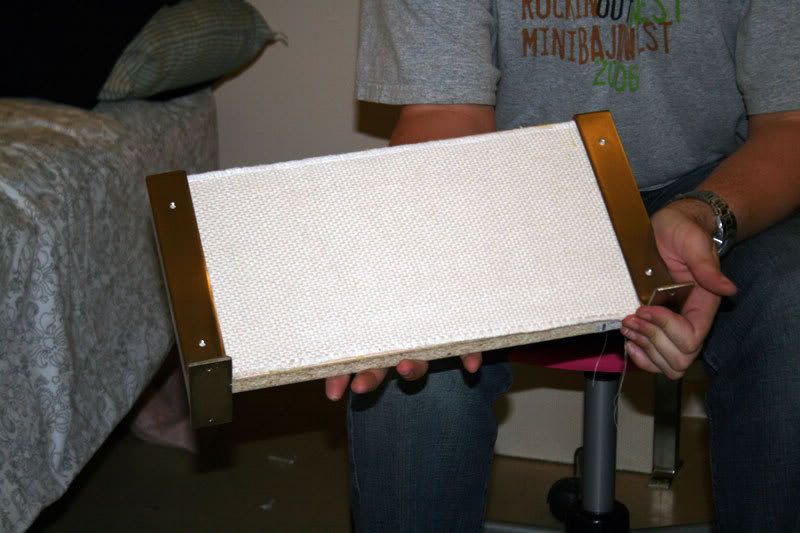
1. Using your wood saw, cut your JÄRPEN to the desired lengths. I made the logical (and cost-efficient) decision to just make four shelves of equal size, so I just cut each of my 31" boards in half.

2. Cut a rectangle of your ROSKILDE rug the same shape and size as the top of each of your shelves.


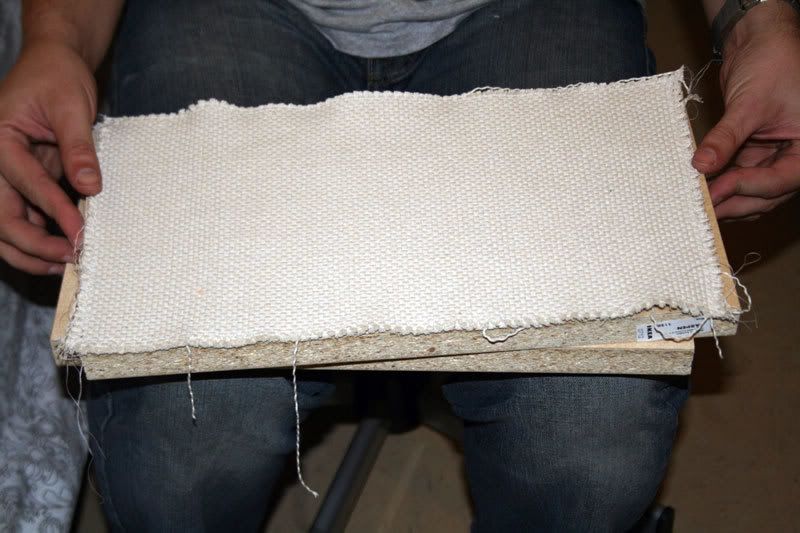
3. Hem this on all four edges by the method of your choice.


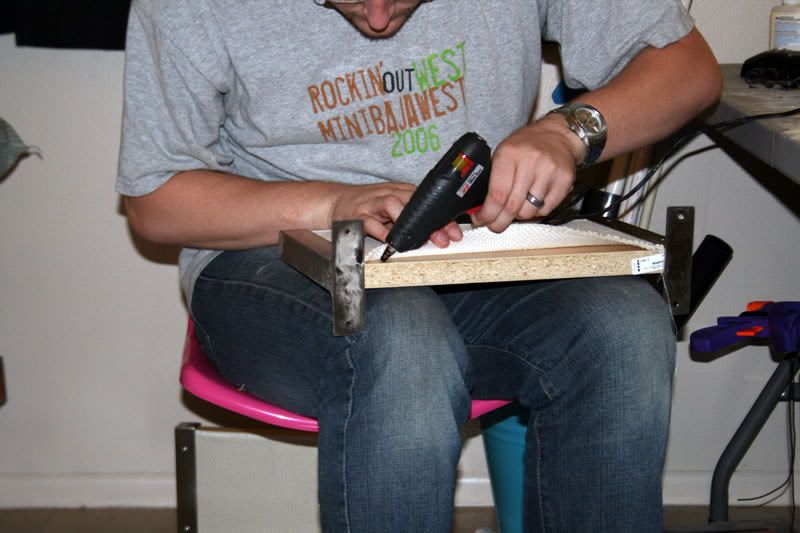
4. Sandwich one end of the cover and the JÄRPEN into your BJÄRNUM bracket. Don't worry if you aren't perfect.


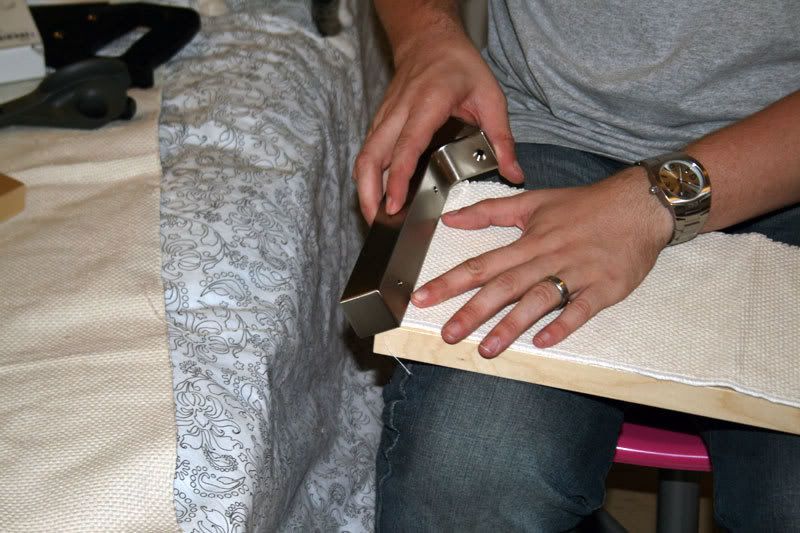
5. Use the hammer to force the wood all the way into the metal bracket, and use your putty knife and hammer to straighten the fabric.


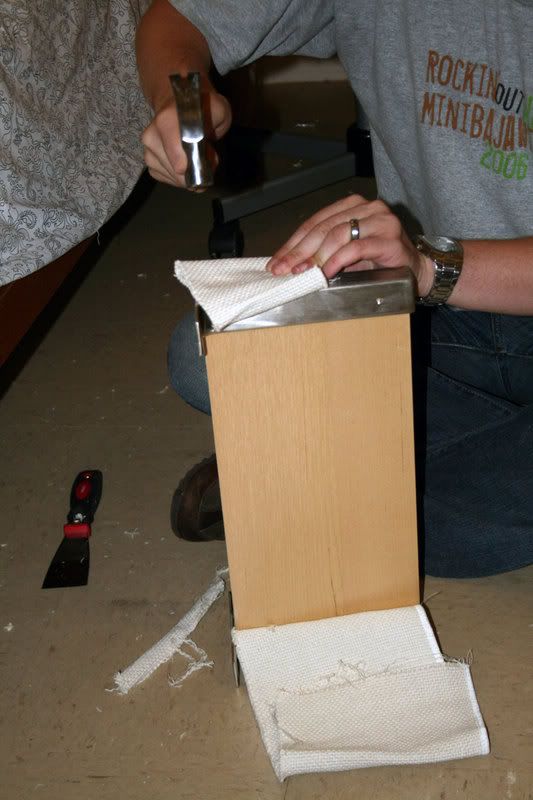
5. Install the other side of the BJÄRNUM. Don't worry about getting the fabric sandwiched at this phase, it is way too frustrating and unneccessary.


7. Using your puddy knife, drive the rug fabric into the crack between the JÄRPEN and the BJÄRNUM. This should take most of the slop out of the rug.


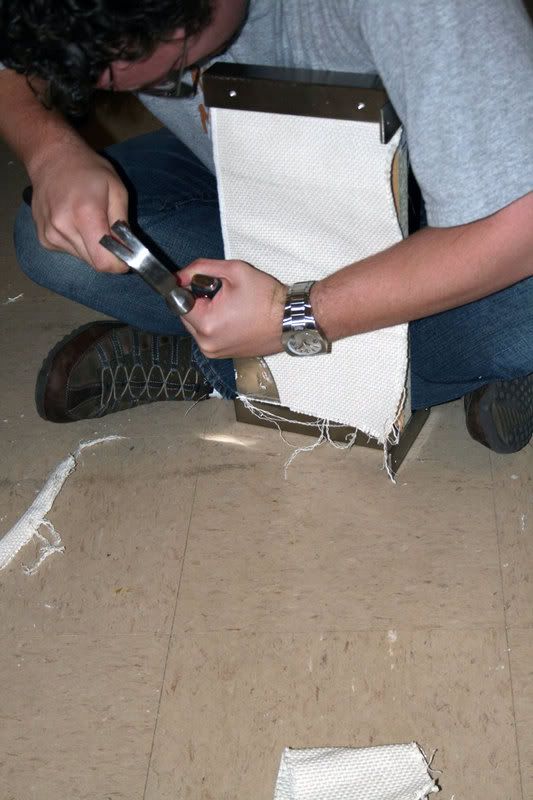
8. Once the fabric is fully installed, lift the edges one at a time and apply hot glue to keep it from sliding sideways.


9. And, you're done!


Install in the location of your choice by whatever method you want. I recommend picking a stud for at least one side, and using the very-capable FIXA drywall anchors for the other side. It took my cats a couple says to realize that they had a new toy (I didn't want to force them onto it, the curious exploration was half the fun!) but now they use it quite frequently. They like being able to get to the highest point in the house, and I like being able to watch my cats be cute and the TV at the same time.

(ed: Original posting date: 9-6-2007)

How to make Bleach Shirts

This is a very low cost technique that produces very cool results. I discovered this technique in the stencilrevolution.com tutorial section, so they get the credit for the original idea, and I can't for the life of me remember who linked me there.

This is what you'll be making:


Supplies you'll need:

  • A shirt--at least 50% cotton. Black is easiest to touch up afterwards, and usually has the coolest effects. I haven't experimented with other colors yet, although I've bought a few, so stay tuned
  • Bleach, and Bleach Accessories--This includes bleach filtering mask (look, they have on especially for that), nitrile gloves (not totally neccessary), clothes you don't care about (not shown), bleach (duh), and a couple fifty cent misting spray bottles from walmart.
  • A stencil, or a design on some stencil material and a way to Cut It--The three basic ways to cut stencils are use a razor or exacto knife, use scissors, or burn them with a soldering iron. All three have their strengths for different applications. Don't try this with any non-plastic stencil materials. Cardboard won't work, neither will paper. Shelf paper works great, and is already sticky on one side, so you won't need adhesive. I use overhead transparencies, because they fit in my printer and I already have a grip of them.
  • Some Other stuff--Some spray mount adhesive (experiment with anything from 3m if you have to, but repositionable stuff is best), a t-shirt board (bought or cut out of a box), and some fabric dye pens in case you screw up, or to add difficult detail


Because I want this to be a very large design, I printed four stencils with alignment marks. I'm using an exacto knife and a metal ruler to get nice crisp straight lines everywhere it's straight...


...and scissors anywhere it's curved. Good rule of thumb.

[insert one hour of watching Tila Tequilla's Shot at Love here]


Ok, got my stencils all nice and cut out (and in this case, labeled, so I don't mix up the parts). Time to stick them on the shirt.


A little spray adhesive to stick the shirt to the shirt board so that we have a nice smooth surface to work with


Hit your stencil with a light dose of adhesive, and, with a little careful layout work, (unless you don't care if it's edgy and off center), mount it up.


Bleach is some toxic shit, yo. Wear nappy clothes (or all white if possible), nitrile gloves, and a bleach mask...your lungs will thank you!


To reduce overspray and bleeding, try to keep your sprays light and misty, and from the same angle.


It starts developing almost immediately. If you want to create layers, you can spray different strengths of bleach. The two I used in this shirt were straight and about 30 bleach/70 water. Let it sit as long as you like. I let this one sit for one commercial break (12 minutes?) because I was impatient, but I bet it would have gotten whiter if I'd left it longer.


Bleach builds up on your stencil, so pat it dry before tilting or you'll get runs.


Rip it off the board and chuck it straight in the dryer before the bleach has time to spread. Couple minutes should be enough to get it dry...any longer, and you're using too much bleach!

ed: I have since learned that it is better to chemically cancel the bleach by soaking the garment in hydrogen peroxide, before drying.  This chemically stops the bleaching process, and will keep it from eventually damaging your shirt.  Also, any dye needs to be heat set with an iron or it will bleed when you wash it.

My camerawoman wandered off while I was doing touchup, but if any bleach got under your stencils, you can take a fabric dye pen and clean up your lines, if you are going for a nice clean look. Otherwise, just let'er rip.


When hobbies colide! I'm pretty happy with how this turned out, espcially the shading...that didn't just happen, i tried to blend between the darker 30% and the lighter 100%, and I'd say with good results. I'd say it is at least as nice as the $17 punisher shirt I almost bought last week at Hot Topic, and it only cost me $2.50 at Michaels. Plus I got to be creative. Yay DIY!

(ed: originally posted 10-29-2007)

Projects remaing to be uploaded

Projects that just need to be transcribed
T-Shirts Bleaching
Crib Hacking
Ikea Desk Nook
Several Nerf Tutorials (Titan and Nitefinder)
Mp3 Car (if I can find it)
Cat Ladder 1&2
Barefoot Running
Nerf Workshop
The Closet

Projects which require further pictures or a writeup (or some completion):
Project Thumbdrive
Home Automation
Lego Fun!
Charging Station

I will use this as a sort of checklist of projects I need to post.  If anyone remembers any other than these, by all means, let me hear about it!

Project Nerdcycle--Exercise Bike Hacking

I am getting fat. It's a fact of life brought on by a desk job and a sedentary lifestyle.

This displeases me, so I decided to do something about it.

I bought an exercise bike on craigslist for $100. I rode it five times. It then became my footrest while I surfed the net, as it is next to my computer.

I decided enough was enough, and I had to make it fit into my lifestyle. So, some hacking was in order.

Exercise bike before:


Spare monitor I happened to have lying around with no home, and a mount I picked up at work that seemed suited for this project:


First things first, I had to see how much wiring I was looking at, so I took the control unit off.


Doesn't seem too excessive, I'll just cut the harness in the middle and extend it.

First, though, that bookholding lip has got to go, and I'll need to drill some holes and mount the backplate for the monitor mount.


Looks good!

Now, where to put the control unit. I still need to be able to use it while I'm riding...I think right by my left hand would actually be more convenient then the stock location.

I mock up a mount idea with a paint stirrer and some PVC:


Fits perfect, the ergonomics are vastly improved over stock. My 'mockup' is actually quite sturdy...I was going to make a metal one after work tomorrow, but I may just stick with this one until it breaks, if it ever does.

On to the more difficult part....extending the harness. I have some bulk CAT-5 laying around that I decide to use as raw materials, and 30 butt connectors later...


....I've got a 4' harness instead of a 18" one. Wasn't so much difficult as tedious.


Moment of truth...


Yay, everything works!

This is as far as I got today:


Still to be done:

*loom the wires and ziptie them so I can't trip and die

*Figure out what source I'm going to use for this (most likely: rig up a laptop shelf/slot)

*Make an adapter plate to raise the monitor 3" (my knees hit if I'm peddling vigerously)

*Come up with a workable keyboard solution

*Make a matching mount by my right hand for a mousepad

All in all, not a bad days work! Once it's done, I'm going to do all my at-home internet surfing on it. I may put a switch on it so the monitor only stays powered up if the RPM is above a minimum level, we'll see!

(ed: Originally posted 2-13-2008.  Submitted to Lifehacker for their reader contest, and won a book with it!   Also, every google search result for as many pages as I looked through for the term 'nerdcycle' refers to my project!)