Monday, December 15, 2008

Pregnancy Q & A

Someone emailed me this and I thought it was useful enough to share. Here are some great Q & A on various topics about parenting and childbirth.

Q: Should I have a baby after 35?
A: No, 35 children is enough.

Q: I'm two months pregnant now. When will my baby move?
A: With any luck, right after he finishes college.

Q: What is the most reliable method to determine a baby's sex?
A: Childbirth.

Q: My childbirth instructor says it's not pain I'll feel during labor, but pressure. Is she right?
A: Yes, in the same way that a tornado might be called an air current.

Q: When is the best time to get an epidural?
A: Right after you find out you're pregnant.

Q: Is there any reason I have to be in the delivery room while my wife is in labor?
A: Not unless the word 'alimony' means anything to you.

Q: Is there anything I should avoid while recovering from childbirth?
A: Yes, pregnancy.

Q: Do I have to have a baby shower?
A: Not if you change the baby's diaper very quickly.

Q: Our baby was born last week. When will my wife begin to feel and act normal again?
A: When the kids are in college.

Tuesday, December 2, 2008

What Fits in a Honda Fit

Someone, somewhere on the internet, to someone else:
"I don't know if you've ever been in a Fit or a Versa, but their "cargo area" has maybe enough space for a cooler. It would be very difficult to put more than two people + stuff for more than just a weekend trip in there, and camping would be hard as well."

Now, I don't speak for the Versa...in fact, I rather do not like them, and hence don't own one, but this is just untrue for the Fit. It is one of the most efficient transportation vehicles for its size and gas I've ever seen. However, saying is not showing, so, here we go!

Here it is configured comfortably for 4 passengers. With the back seats up, you have about 26 deep x 36 x 36 cargo cube to fill.


This can be filled quite effectively, and easily hold a normal human's weekend roadtrip's worth of stuff, or four backpacking backpacks standing up next to eachother:


In this case, it held:
  • Two Large Sleeping Bags
  • Two small flexible coolers
  • One large low rubbermaid
  • Two large storage rubbermaids
  • One duffle
  • One kitty transport vessel


Now, if it's just a roadtrip for two, which many are, then it's a different story all together. We can fold down the rear seats (not remove them), and with the front seats in a comfortable sustainable position, we have over a five foot deep cargo area. For comparison, this is the same size as a short bed Tacoma pickup truck.


This will hold, um, a rather lot of things. Actually, more things than I had in rubbermaids in my garage, so I had to start improvising (note the large cardboard box and the milk crates of electronic stuff)


Yes, everything fit with the doors closed...that picture was boring due to tinted windows so I didn't upload it.


Still have plenty of leg room. If my wife wasn't taking no part in this nonsense, I'd have a picture of myself sitting comfortably in the driver's seat.


A total inventory:
  • Three Large Sleeping Bags
  • Two small flexible coolers
  • Four large low rubbermaids
  • SIX large storage rubbermaids
  • Two milk crates
  • One large cardboard box
  • One duffle bag
  • One full daypack
  • One internal frame backpacking pack
  • One kitty transport vessel


I'd say this is a rather bit more than 'maybe enough space for a cooler,' and if you need more than that for a weekend camping trip, why, I pity you.

If you have another person you want to bring along, you can easily sacrifice, say, two of the large tubs and fold up one of the back seats and not lose much storage--they are 60/40 split, so he will still be comfortable, and you can carry the above minus two of the large rubbermaids.

This doesn't address the 'long' option for carying, where the passenger can sit behind the driver and the front passenger seat flips back, allowing you to fit up to a 9'6" item (like say, oh, a pair of these kayaks) in the passenger side.

I did this as an exercise for my self as well, as I'd never tried to max out what I could Fit in the Fit. This load is in addition to a dining room table and four chairs (with a passenger), two large rolled area rugs (11 x 14 and 10 x 10, I believe, again with passenger), an assembled desk and chair, and many many other things on a daily basis. Did I mention it gets 35mpg, and is consistently ranked 'best value' and has a couple 'car of the year's under its belt as well?

What can I say other than THE FIT IS GO!

Tuesday, November 18, 2008

Ceiling fan mod--buying light kits is for suckers

I bought a really cool ceiling fan that looks awesome and goes great with the look of the house.  However, it doesn't have a light, and I need one.  All the light kits available at Home Depot hung down way too low, so I decided to make one myself out of the stock light and some bits.  I didn't document this as fully as I usually like to, but I did take a bunch of pictures at beginning, middle, and end, so, onward!

Here's the stock light.  These lights are installed all over the house, so it was important to me to match it with the finished product.

1stock1.jpg

Our house is Spanish/Mission/Craftsman style, so this wrought-iron looking fan goes perfect with it.  It took me a solid evening to install, having to reinstall the whole thing (including the support box) three times to get it all installed to my liking (I'm still not totally happy with how the wiring is)

1stock2.jpg

This fan didn't come with a light, but the bottom 'cone' is removeable--or rather, I had to install it.  It had a bunch of electronics in it that I decided to relocate slightly, but more on that later.

1stock3.jpg

Here's the lamp on the ground.  I am going to use the shade...the guts are no good, they're made of cheap sheet metal that I won't be able to use.  It only has two bulbs anyways, and I want my light to have three.

2parts1.jpg

Here's a mockup of what I'm going for:

2parts2.jpg

All of these electronics were in the cone (told ya I'd come back to it), and I relocated them to attach to the bottom of the base.  No major problems with getting everything to fit, I'm not sure why it wasn't like that to begin with.  Note the white and blue wires with the quick disconnects--those are what we will be using for the light (it's what they're for...see, the blue one says 'for light...who am I to argue?)

2parts3.jpg

Due to a great stroke of luck (because I hate drilling glass), the little cap on the end of the cone threads onto a bolt that fits perfectly through the whole already in the glass glass.  This will make my job waaaaay easier.  Also, I think this looks pretty snazzy...this just might work!

2parts4.jpg

A quick run to Home Depot later produces three sockets, a six pack of bulbs (I'm a sucker for the 'reveal' lights), and a nice long 10mm x 1.0 bolt (the thread pitch that the cap fits on).  Oh, and a bunch of tiny screws to mount the sockets...their little tabs had a TINY hole.

3hardware1.jpg

Here's the plan to mount the shade.  I was going to drill out the threaded end that the cap fit on, but it actually unscrewed (even easier!), so the bolt goes into the cone, a retaining nut goes on to hold it securely, and I'll sandwich the shade between neoprene washers on the end.  Easy peazy.

3hardware2.jpg

Here is where I stopped taking pictures and just WORKED...it took me about 3 days off and on to finish it all.  Three light bulbs was a tight fit in the shade, so I had to dremel clearance holes for the bulbs (ugh, dremeling FOREVER), I had to drill tiny mounting holes for the sockets to mount, and I drilled a nice big hole for the cables to pass through.  I also threw in some reflective heat protectant sheet that was in the light...don't want to fry whatever was in those electronics boxes!

3hardware3.jpg

Here's what it looks like with all three bulbs on.  I picked this bulb arrangement because you can actually change the bulbs (something I almost didn't think of, haha)...I tested each socket before I tightened them down.

3hardware4.jpg

Yay finished product!  This is unlit.  You can just barely see the purple of the bulbs...I may have to change to regular white bulbs (or clear) to get away from this if it starts to bug me.

4finished1.jpg

Here it is lit.  I'm very pleased with how it turned out.  Total cost, around $10ish dollars in parts, and I had to buy a new pack of cutoff wheels for the dremel, but I didn't use them up so I'm not counting them.  I like it better than any of the $30+ light solutions I saw for sale, and they all hung down way further (important, as this light is already pretty low)

4finished2.jpg

I call this project...success!

4finished3.jpg

Friday, November 14, 2008

Fish Blimp...the most beautiful thing I've found online in a while

Found this on vimeo, had to share...such a simple Idea, I'm jealous I didn't think of it first!


Air Art from flip on Vimeo.

Tuesday, October 7, 2008

Semi-DIY, Wall-Mounted, Recharging Station/Laptop Desk/Every-Day-Carry Organizer

So, I had a need. It is a common one. I had many (so many!) digital gadgets that needed to regularly suckle at the electric teat. This resulted in an octopus mess of chargers, digital devices crammed everywhere there was an outlet, and a constant search to find plug A suitable for fitting into slot B.


I also had some uncommon raw materials that were dug out of the trash (full disclosure: at my previous place of employment.) Specifically, some pieces of a Wall Furniture Unit. It is meant to be used thusly:


but I had some miscellaneous pieces (and a stick of cable management) on my hands and decided to repurpose them into..


"Semi-DIY, Wall-Mounted, Recharging Station/Laptop Desk/Every-Day-Carry Organizer" (SDIYWMRS/LD/EDCO? Catchy!)
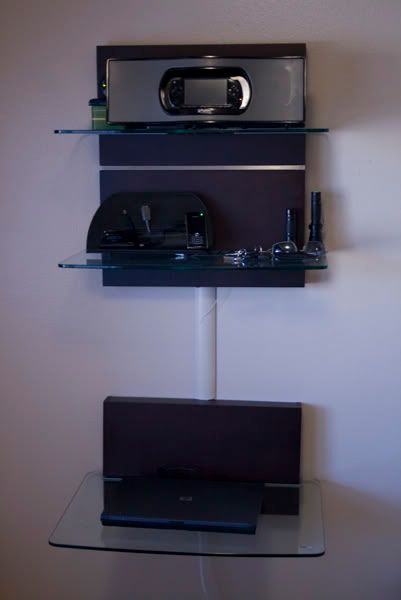


Features:

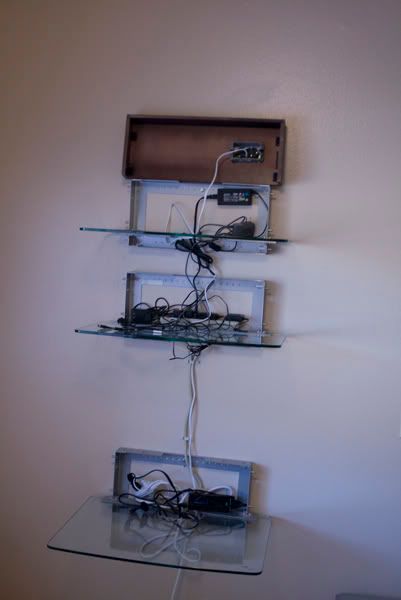
Bottom laptop shelf is desk height (29" or so, I don't remember) for emergency desk use. It's in the breakfast nook, so it's not hard to just flip a chair around and type.


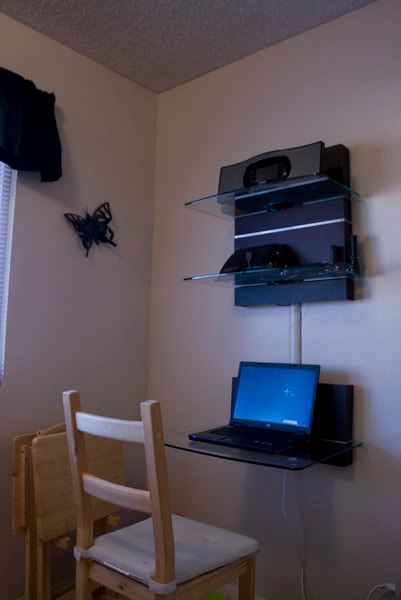
Middle shelf holds everything I carry on me every day (keys, wallet, flashlight, sunglasses, work badge, etc), as well as my cell phone, all in one place. This is right by my carport door, so I just load and unload on my way in and out of the house.


Middle shelf also organizes all of my chargers for various phones, gameboys, portable DVD players, MP3 players, cameras, etc. The little phone stand/organizer thingy was picked up at a tradeshow.


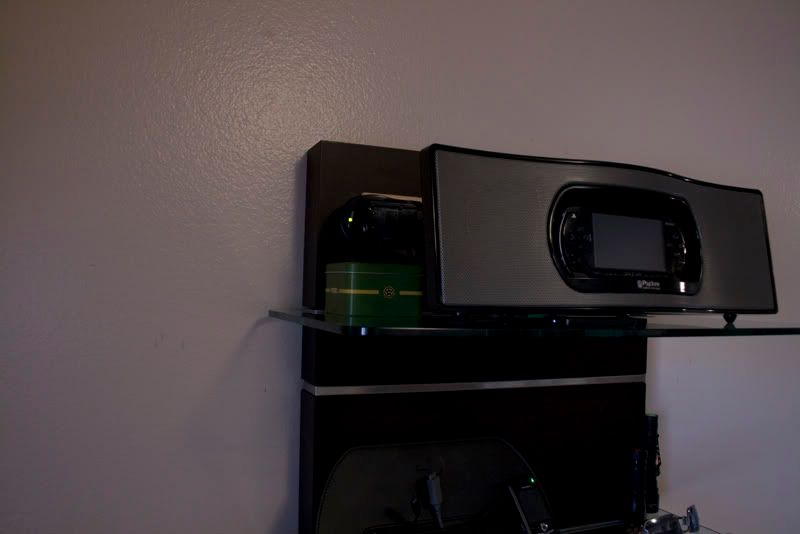
The top shelf has both a media dock (with IR remote!)-slash-charger for the PSP and an exposed outlet for outlet battery chargers (shown: universal Canon charger with fittings for my three Canon cameras in the little green box. Not shown: the charger for my cordless drill batteries)


Now, this (and other recharging stations) isn't so much a DIY project (strictly speaking) as it is an idea...mine just happened to have (pats self on back) a particularly slick implimentation. I suggest that everyone figure out SOME solution that works with their house and life, and do it! Don't just tolerate having cord mess when there are so many better ways to make your life simpler and neater.


Now, with that "The More You know!" out of the way, here are the guts of my particular charging project, hopefully to inspire you to create one of your own:
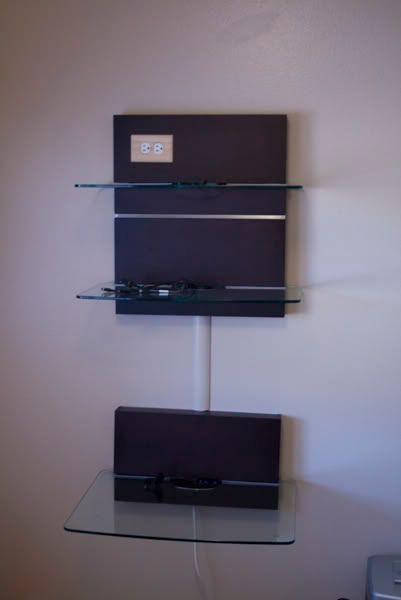


Here it is 'naked':


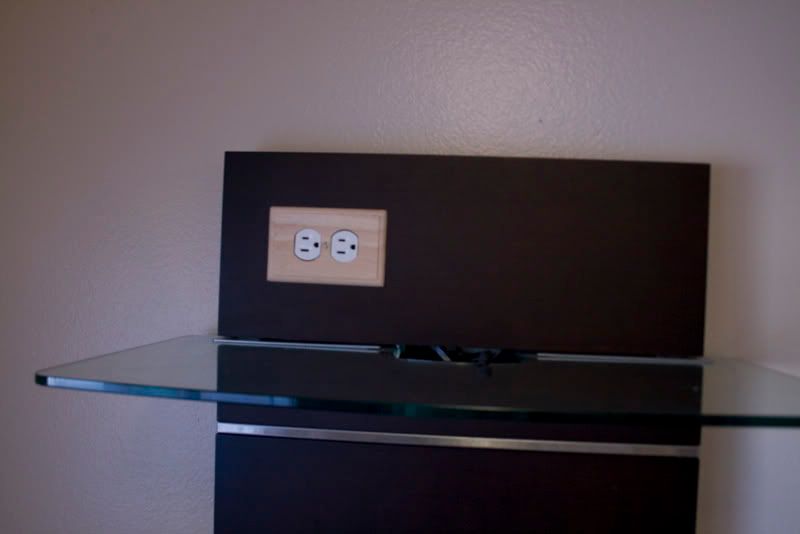
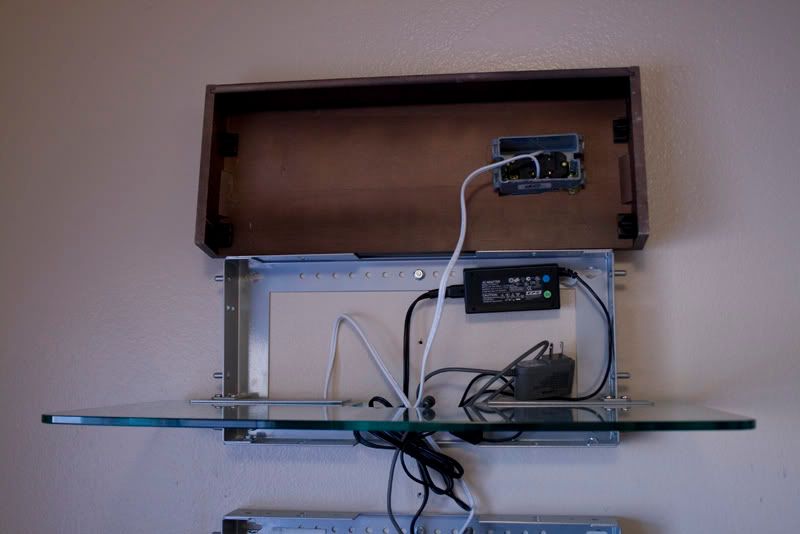
And a closeup on the custom outlet (that I never got around to stain matching) at the top:


Now, if that is naked, here it is skinned:


Its guts are a power strip, an extension cord with a grounded triplex end, and an outlet mounted power filtration-slash-surge protector-slash-overload protector (not shown) to make sure I don't light my house on fire. Oh, and some of that 3M double sided sticky stuff.


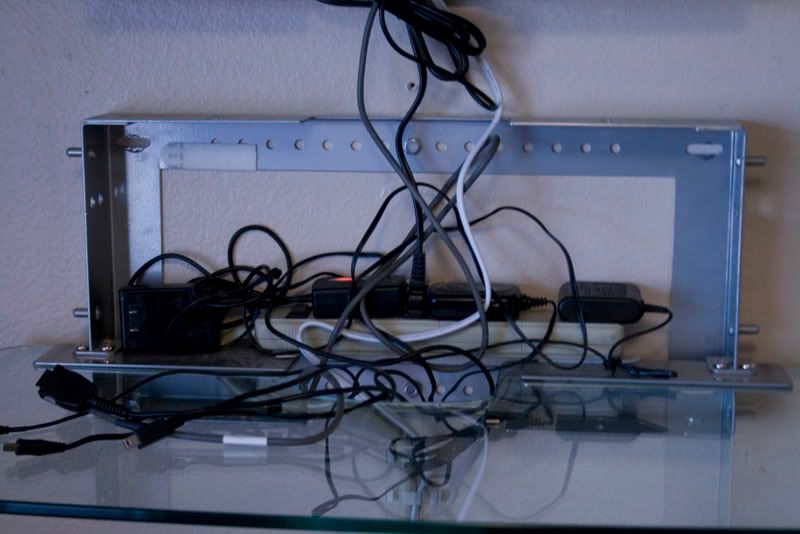
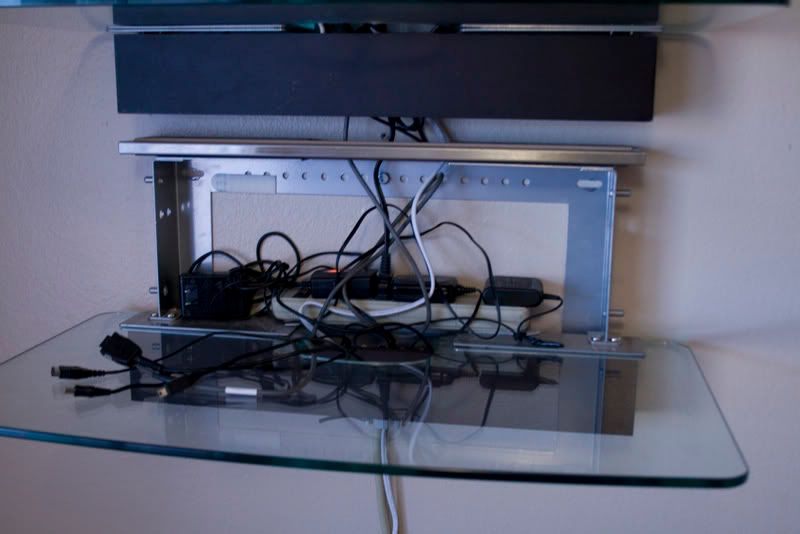
Behind the bottom cable management, I have the head for the triplex outlet. Into this I plug the power strip (which goes up to the next panel), the laptop charger (not shown properly installed--normally the brick gets 3m'ed to the wall and the unused cord ziptied), and the cord for the outlet on the third panel (because all my outlets in the power strip were taken)


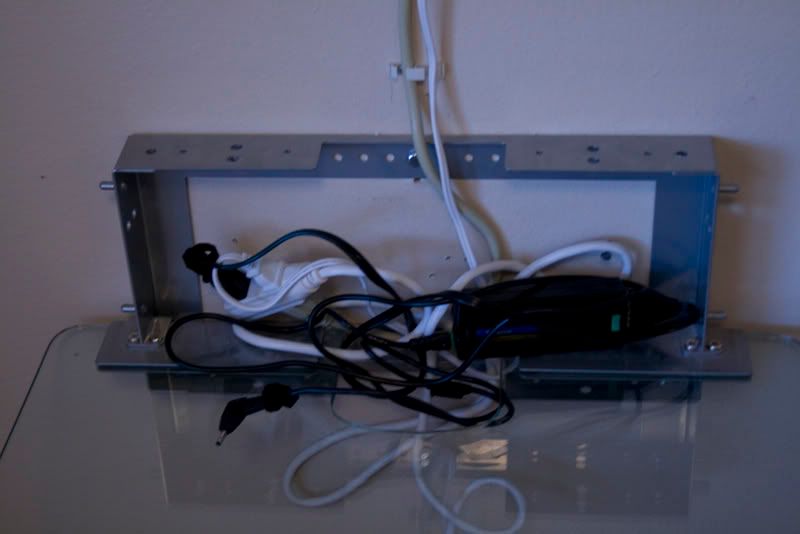
Behind the second panel, I have the power strip (stuck to the shelf) with all my chargers plugged in. I thought about getting some outlet extenders for maximum utilization, but I ended up just unplugging and alternating my less used chargers (you can see one not being used)...this panel is really easy to get on and off.


The third panel has the outlet mounted in it. I jigsawed a hole out of the cover, cut the back off a j-box, cut the head off an extension cord, and hardwired a plug onto an outlet (danger!!! do this at your own risk!!!...not suggested for houses with small children!!!). I flushed up the faceplate with the front of the panel, and then hotglued it from the back to hold everything in place.


You can also see the brick for my PSP charger stuck to the wall and the cord ziptied (this is how the laptop usually is), and a random charger I dont even remember the purpose of that somehow got built in.


Functionally, this works great for me. Having all my chargers organized and in one place super simplifies my life, not to mention the convenience of having all my pocket stuff there, too. As you can see on the panel 3, there are clips that hold the covers on, so it's not hard to change things around, but, to make it even easier to change the main chargers in panel two, I didn't even put the clips on, and just have it be a perfect fit and let friction hold the panel, so I can take it off like so, and change my chargers:


Before I settled on this, I kicked around ideas using roller breadboxes with false bottoms, a drawer, an end table, an upside-down box with all my chargers in side and holes for the cords to come out. I know there are a couple commercial solutions that are similar, but I had never found anything with all of the exact functionality mine has, and definitely not with the same aesthetic.

Friday, September 26, 2008

Ridiculous facial hair

So I was fooling around last night and partially shaved off my goatee, intending to take a picture and finish the job (or trim it down to a sweet 'stache, at least). I got busy, fell asleep, and forgot about it until just now when I went to the bathroom and saw myself in the mirror and started laughing. Took this pic last night....enjoy hehe.
Sent via BlackBerry from T-Mobile

Thursday, September 25, 2008

Woo hoo! Yay new house!

This just popped into my inbox!

Hi Martin and Deborah,

I wanted to let you both know that we received the final clearance from the investor/underwriter. Everything is ready for your closing date. The title company will be contacting you to schedule a time to sign closing documents. Please let me know if you have any questions or concerns. I just want to thank you also for getting me everything I needed so quickly! I really appreciate all of your help. It has been a pleasure working with you. Congratulations on your new home!


Sincerely,

Janis ******


Yay new house!  So exciting!  We actually turned power and gas on Tuesday so that they can finish the installation of the AC tomorrow, and put all the kitchen appliances in.  We have a walkthroug/orientation on Monday afternoon, I'm guessing we have to meet with the title company to sign some stuff, and then we get the keys!  Huzzah!

*does a little happy dance*

Wednesday, August 6, 2008

Creating Outlook Macros and Linking them to Keys and custom buttons

To streamline my Inbox Organization process even further, I decided to see if I could automate things, by mapping buttons and shortcut keys for "move to folder and mark unread" for Action, Respond, and Waiting, and "move to folder and mark unread" for Temporary Hold and Archive.

The best tutorial was this blog article, descriptively called Outlook Keyboard Shortcuts to Move a Message to a Folder: http://www.fiftyfoureleven.com/weblog/general/outlook-email-shortcuts

You can basically follow that exact walk through with the following caveats:

  • SelfCert.exe, at least on this machine, is a weird piece of software: the interface of which was all question marks...as in ???????? ????????? ????????--it performs as advertised if you just follow the steps described on the Microsoft website (hit enter instead of OK after you type your name if you can't tell which ?????????? button is which), however it wasn't located where the site said it should be--I had to do a search to find it
  • First, pick the letters you want to use for your shortcuts. I realized I had two "A" folders, so I renamed Archive to Vault. I also choose to display them "Image and Text", and picked cute little pictograms to represent my five folders. Also, Temp Hold got renamed "hold" since I couldn't figure out how to make the two word name work in the macro.
  • Second you can drag the new macro buttons wherever you like, not just on the standard toolbar. I put them up next to File Edit etc.
  • Third, you can use whatever letters you want, but you need to delete the & signs from the names of the commands that originally had them. For example, if you want Hold to be "alt-h", you need to rename the Help menue from "&Help" (the current alt-h) to just "Help" . If the letter you want to use isn't displayed with an underline on the current toolbars, you're in luck...do note when looking for conflicting letters that it doesn't have to be the first letter (I'm looking at you, Find)
  • Finally, if you open any piece of mail, you can customize it, too. That way if you're reading a message (or clicked 'ok' on the "you have new mail, would you like to read, like I just did") you can add all your buttons (using the exact same process as above) to disposition the message without ever even opening your full outlook window
  • Helpful Hint: it isn't very intuitive, but the renaming command and other properties are only available while the 'Customize Toolbar' window is open. You'll see what I mean once you try to start doing it.
  • The first time you try to run your macro (or possibly the first time you close and relaunch outlook, and THEN try to run it), it will prompt you asking if you want to trust macros from "your name"...check 'trust always' and click yes, and you won't have to do it again. It is important that you digitally sign your macro project using the SelfCert or it won't let you run them next session and this will be a big pile of wasted effort.
  • All in all, this is a reasonably simple process, and barely requires anything more than basic Office knowledge. YMMV with different versions, and obviously this is Windows only (there are easier ways to do it on a mac, they are linked in the first article in this blog post), but the general steps should be basically the same.

Enjoy your new found organizational ability! Here's some pics!


Outlook Organization Addendum

Addendum:  After using the system briefly, I decided to adopt the full 5-folder system, at least for now.  The difference between a "Temp Hold" and a "Waiting for Response" is significant enough that I think it warrants its own folder.  Plus, the Waiting has so far been my most used folder, as whenever I send action requests to others, I drop my sent mail in there, so I can keep track of any pending requests.
 
In this case, I don't actually have any truly 'unread' messages.  What I do have is nothing in my inbox (yay!), one item that requires action (that I have marked 'unread' so it will show up on the folder), two items that require quick responses (both marked 'unread' after getting dropped in the Respond folder), and one item I'm waiting for a response on (my 'copy sent into inbox' rule automatically marks my sent messages unread as it copies them, so I just dragged it into 'waiting').  This system has been so far quite suitable for dealing with everything that has come in. 
 
You can see by the Plus sign that I have some Archive subfolders...so far they are Reference and CYA, but if something that I feel like I want to save long term doesn't fit nicely in one of those, I'm not afraid to just let it live in the main archive until I see a large enough trend develop to deserve a subfolder.
 
The hardest part of the system is viciously and immediately deleting things that don't fit in one of the five categories.  It is totally worth the effort, though...not to mention outlook will never get bogged down.  At my previous job, my inbox had 5800 messages in it, for no particular reason, I had just never thought to delete anything.  In this system, I will never run out of mailbox space, and if my archive somehow gets large enough to get close, well, I have an easy choice of which folder to archive locally.
 
The folder system is actually streamlined enough that it makes my color formatting obsolete.  I'd have to be getting truly epic volumes of mail to have enough stuff in my inbox at one time to need to visually distinguish between them.

Monday, August 4, 2008

Outlook Inbox Optimization

Since I started a new job, and don't yet have a flood of emails streaming in, I decided to take some pre-emptive steps to manage my inbox.  I'm using three different techniques--Some things I implimented at my previous job, some are new, so I'm not sure whether they will need to be modified to work well together, or if they will compliment eachother.  I will follow up after a couple weeks once I know how much I use them.
 
1. Priority Coloring
I've used this for years, and it really makes it easy to sift through a busy inbox.  Using autoformatting, you can specify that messages be different color based on how they reached you.  From highest specificity to lowest:
  • Messages only to me are blue
  • Messages to me and others individually are black
  • Messages I am CC'ed on, or that are to my group are dark grey
  • Messages to the entire company are light grey
This gives you an easy at-a-glance indicator as to how important it is that you react to the message.  New messages coming in are usually bolded, so they retain the coloring.
 
2. Sent mail in inbox
I set up a rule to copy any sent mail to my inbox.  This way, I can sort by subject line and see the whole conversation thread.  If your version of Outlook isn't smart enough to know that "RE: Lunch Room" goes with "Lunch Room," then you can pull up the field chooser and sort by Conversation instead.  This rule by itself is very convenient, but actually works a little bit against my next technique, but I'm still able to make good use of it.
 
3. Zero Inbox
As a goal, this technique immediately sorts all incoming email into folders, and gets them out of your inbox.  I read about this on lifehacker, where Gina Trapani links to the originator (which I've forgotten at the moment), who originally crafted a 5 folder sort system.  Gina went even further, making to mergers to simplify to a 3 folder system.  I'm not sure I'm ready for that amount of streamlining, so I'm going with a 4-folder system:
 
  • Respond - Any emails that can be responded to in less than 5 minutes.  Anything that can be responded to in less than 1 minute, just do as it comes in and don't bother to file it.  Gina merged this with Action and called the whole thing "Follow up".
  • Action - Any emails that require more than 5 minutes of work to respond to, or that have work instructions.  Marking active tasks unread as you place them in this folder give you a running tally of currently active tasks, is a way to keep yourself aware of this folder's contents.
  • Archive - Long term reference message storage.  This folder can have sub folders by category if desired, although since it is searchable that is probably not needed.
  • Temporary Hold:  Stuff that requires no action, but that you want easily accessible.  Examples would be tracking numbers, order confirmations, or other stuff you might be referring to over the next week or so.
  • Trash - Yes, I know this is a fifth folder, but it's one that is already there.  Delete visciously.  Anything that doesn't go in one of the top four folders, or anything from those folders that you are done with and don't need to move to archive, gets deleted.
Because I have my sent message copying turned on, I disposition my own messages just like I would anyone elses (am I promising to do something, am I sending out information I would like a permanent copy of?).  This lets me keep a running conversational record of the exchanges.
 
It's actually ridiculously easy to impliment all of these techniques, so much so that it is a little frustrating that they aren't turned on by default.  If anyone is curious about them, just poke around in the "organize" menu, and you can see the rich available options for the (separately grouped for some reason) Rules Wizard and Auto Formatting.

Sunday, July 27, 2008

B-cat attack

B likes to rampage arround with no traction on the tile. I got in his way and suffered the accidental consequenses :(
Sent via BlackBerry from T-Mobile

Sunday, July 20, 2008

A B in the closet

We have solved the mystery of how clean clothes somehow get cat hair on them while hanging in the closet! B apparently likes sleeping in there.  And yes, for those not in the know, our cats are named B and Z.
Sent via BlackBerry from T-Mobile

Friday, July 18, 2008

New Job and Cool Knives

I accidently got a new job (ask me about it if you haven't heard, it's a funny story). It should be a fun new challenge.  I start the beginning of August.  It is at AmSafe Aviation, an aerospace seatbelt company.  They have a huge production facility here in Phoenix, and are the #1 supplier of aircraft seatbelts worldwide...start checking the back of your buckles when you fly!

Related to this by a distant tangent (stay with me), I've been looking to get a new pocket knife. I miss being without something sharp from my Boy Scout days, but the last time I bought a knife and tried to carry it, it was a cheap 'tactical' knife with huge blade, and I sliced my finger with it pretty badly from being out of practice (it left an interesting scar, I'll try to take a picture of it see below). I think I gave that knife to my dad with blood still on it.
Ouch :(


Anyways, now that I'm not a teenager, I have no desire to carry a giant manly scary looking knife, so I was poking around on one of my forums (edcforums.com) for something more 'gentlemanly' and less likely to cause alarm.  I noticed a knife designer, Chad Los Banos, who designs knives for Boker, responding to people's comments.  This level of interaction was very impressive, and even more intriguing, his knives are available for sub-$30--skirting clost to impulse-buy prices (or easy birthday gift range...ahem ahem wink wink nudge nudge two weeks is plenty of time for ordering things online).

The two knives that interest me the most are the Boker SubClaw and ResCom.  They are both variants of the original Boker SubCom design.


The ResCom (bottom, if you couldn't figure out) is available with a red handle, which I'd love so I could easily distinguish them.  It has a 'blade' optimized for ripping seatbelts and other webbing (which I'll be working with on a daily basis--see, I told you it would tie back in), as well as a serated section for making short work of thicker ropes.  The SubClaw's 2" hawkbill-style blade is great for more conventional knifing duties, and at $26 each for the ResCom, and for the SubClaw at edcdepot.com, I'm going to have a hard time not daily carrying both of them.

Thursday, July 17, 2008

Debbie's toad

Every night we go on a 2 mile walk, and every walk it is debbie's mission to find 'her' toad. We have seen him about four times, we have seen a baby toad twice, and today we saw this big fat guy....unless 'her' toad has been pigging out, probably not the same one.

It's funny because Debbie has taken over the flashlight (we are still walking) and is making sure every rock is not a toad
Sent via BlackBerry from T-Mobile

Monday, July 14, 2008

Cross post from the Charlotte sector

[Cross posting this from tcs in case I didn't configure the post-by-email correctly over there]

We are sitting in the ob's office waiting for what is hopefully our last prenatal visit. I am getting so excited...I can't wait to hold Charlotte!

The worst part of this trimester for me has been the waiting. The hospital bag is ready, the car seat is, well I still need to do that....however, the nursery is ready, the blog is up, and we are ready to rock and roll! Charlotte sector, come on down!

I was almost intentionally late--the one time they got Debbie in as soon as she got here was the time I was ten minutes late...the whole appointment was over when I got there, whereas we have been here ten minutes already now.

This entry is a combination brain dump, nervous fidget, and test of the Charlotte broadcast system... If there is any news of progress you'll find it here (or tcs hehe) in about an hour!

Thanks for all the votes, it's great to know so many people are looking forward to meeting my daughter :-) I am at the top of that list!
Sent via BlackBerry from T-Mobile

Baby blog is live! (for people who haven't seen it)

So, we've got thecharlottesector.blogspot.com online and ready for live announcements as Charlotte transitions from womb to world.  Feel free to go check it out!  There's still some time to get your birth time guesses in if you haven't already!  

Cell phone signal allowing, I'll be making live posts from the hospital to keep people up to date, so bookmark now!

http://thecharlottesector.blogspot.com/

Friday, July 11, 2008

Cats are weird

Do all cats use body pillows?
Sent via BlackBerry from T-Mobile

Thursday, July 10, 2008

The Cubicle Sector!


I actually cleaned up my desk today so I thought I should document it just to prove it has happened. My cubicle is about 50% the size it needs to be for all the stuff that is in it!


Edit: Ugh, the second one is horrible quality. I'll bring in a camera tomorrow.